|
XML Whitespace is evil and should be punished |
||||||||
I've spent a bit of time recently working on a flash based reporting website. The project is all pretty standard architecture for a flash website, but there has been a persistent issue about loading times and poor user experience.
After having a bit of digging around behind the scenes it appeared as though the flash SWF file was streaming a configuration XML file in the background. This isn't a great idea at the best of times but in this case the file was 147k lines long and weighed in at 22.5mb. So this accounted for a stack of loading time when the flash app loads up.
After downloading the XML file and browsing through it in Eclipse my first impression is that there was a ton of whitespace in it. After running a quick 'find and replace' on any double space characters (to avoid removing spaces in legitimate text strings) and re-saving the file was down to 3.2mb.
So let this be a warning to anyone loading up machine-to-machine text files. Squeeze them down, don't include whitespace, your Apps don't care about it, the file doesn't need to be human readable, all you are doing is using up network bandwidth.
I won't even get into the risks involved in allowing your config files to be downloaded by people here, that's a whole different issue!
|
Opening a new window from a flex / AIR application |
||||||||
I was sure I had done this before, somewhere but I couldn't find the code anywhere. So I've knocked together a really quick and simple example.
I want to be able to open a new site in a pop up from an AIR application. To do this I need to use the 'urlRequest' function to create a url request. Then insert that into a 'navigateToURL' method, specifying that you want a new window '_new'.
Here is the complete example.
2<mx:Application xmlns:mx="http://www.adobe.com/2006/mxml" layout="absolute">
3
4<mx:Script>
5 <![CDATA[
6
7 public function goToUrl(link:String):void
8 {
9 var urlRequest:URLRequest = new URLRequest('http://' + link);
10 navigateToURL(urlRequest, "_new");
11 }
12
13 ]]>
14</mx:Script>
15
16 <mx:Canvas x="10" y="10" width="321" height="146" backgroundColor="#FFFFFF">
17 <mx:Form x="10" y="52">
18 <mx:FormItem label="URL">
19 <mx:TextInput id="urlTxt"/>
20 </mx:FormItem>
21 </mx:Form>
22 <mx:Button x="10" y="114" label="Go to" click="goToUrl(urlTxt.text)"/>
23 <mx:Label x="10" y="10" text="New Window test" />
24 </mx:Canvas>
25
26</mx:Application>
Works like this.
|
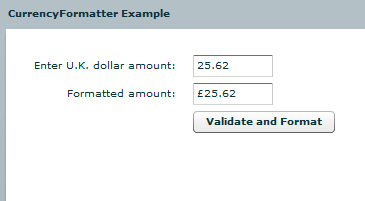
Flex Currency Formatter Example |
||||||||
Whilst developing a new Flex shopping cart I came across an issue in dealing with the formatting of currencies for the payment system. The previous version of the shopping cart had preformatted values stored in the actual database, so I was simply displaying them in the Flex front end.
In this version there is the specific requirement that it is able to handle a multi currency configuration. So I thought I'd dig out the documentation on the Flex currency Formatter.
Firstly create a CurrencyFormatter object, and specify the currency symbol, and any other formatting parameters that you require.
Next create a NumberValidator, as this will validate our entered value as a numeric value, we don't need to try and re-format alpha numeric values.
Then create a form to run the test validation against. I often find it easier to build a test mechanism at the same time. Below is a simple submission form, in the form we just enter the value, click the Button, which fires the Format() function.
2<!-- Simple example to demonstrate the CurrencyFormatter. -->
3<mx:Application xmlns:mx="http://www.adobe.com/2006/mxml" layout="absolute">
4
5 <mx:CurrencyFormatter id="ukFormatter" precision="2"
6 currencySymbol="�" decimalSeparatorFrom="."
7 decimalSeparatorTo="." useNegativeSign="true"
8 useThousandsSeparator="true" alignSymbol="left"/>
9
10 <mx:NumberValidator id="numVal" source="{priceUK}" property="text"
11 allowNegative="true" domain="real"/>
12
13 <mx:Panel title="CurrencyFormatter Example" width="75%" height="75%"
14 paddingTop="10" paddingLeft="10" paddingRight="10" paddingBottom="10">
15
16 <mx:Form>
17 <mx:FormItem label="Enter U.K. dollar amount:">
18 <mx:TextInput id="priceUK" text="" width="50%"/>
19 </mx:FormItem>
20
21 <mx:FormItem label="Formatted amount: ">
22 <mx:TextInput id="formattedUKPrice" text="" width="50%" editable="false"/>
23 </mx:FormItem>
24
25 <mx:FormItem>
26 <mx:Button label="Validate and Format" click="Format();"/>
27 </mx:FormItem>
28 </mx:Form>
29
30 </mx:Panel>
31
32</mx:Application>
The Format() function checks that the value is numeric, and applies the CurrencyFormatter object to the value. Then we simply assign the newly formatted value back to our Text field in the form.
2 <![CDATA[
3
4 import mx.events.ValidationResultEvent;
5 private var vResult:ValidationResultEvent;
6
7 // Event handler to validate and format input.
8 private function Format():void {
9
10 vResult = numVal.validate();
11
12 if (vResult.type==ValidationResultEvent.VALID) {
13 var temp:Number=Number(priceUK.text);
14 formattedUKPrice.text= ukFormatter.format(temp);
15 }
16
17 else {
18 formattedUKPrice.text="";
19 }
20 }
21 ]]>
22 </mx:Script>
|
AIR Phone Book application - Part 3 (Full code) |
||||||||
Below is the full code in one run for the PhoneBook AIR application.
2<mx:WindowedApplication xmlns:mx="http://www.adobe.com/2006/mxml" layout="absolute" initialize="init()"
3 height="280" width="294" horizontalAlign="center" verticalAlign="middle" showFlexChrome="false">
4
5<mx:Script>
6 <![CDATA[
7
8 import mx.controls.Alert;
9 import mx.collections.*;
10 import mx.rpc.events.FaultEvent;
11 import mx.rpc.events.ResultEvent;
12 import mx.collections.ArrayCollection;
13
14 [Bindable]
15 private var loadedData:ArrayCollection;
16
17 public function init():void
18 {
19 // start the move listener
20 moveListener()
21 // get the remote data
22 getData()
23 }
24
25 public function moveListener():void
26 {
27 // mover event
28 outerCanvas.addEventListener( MouseEvent.MOUSE_DOWN, moveWindow );
29 }
30
31 public function getData():void
32 {
33 popData.getData();
34 }
35
36 public function moveWindow( event:MouseEvent ):void
37 {
38 var str:String = event.target.valueOf();
39
40 // if its a datagrid then don't do the move
41 if ( str.search("displayPeople") >= 1)
42 {
43 // Do nothing
44 }
45 else
46 {
47 stage.nativeWindow.startMove();
48 }
49 }
50
51 public function onMinimize():void
52 {
53 stage.nativeWindow.minimize();
54 }
55
56 public function onClose():void
57 {
58 stage.nativeWindow.close();
59 }
60
61 public function resultsHandler(event:ResultEvent):void
62 {
63 // trace(event.result)
64 displayPeople.dataProvider = popData.getData.lastResult
65 }
66
67 public function faultHandler(event:FaultEvent):void
68 {
69 Alert.show("Error: " + event.fault.faultString, "Application Error");
70 }
71
72 public function changeImage(img:String):void
73 {
74 userImage.visible = true
75 userImage.source = "http://www.url.co.uk/wld/phonebook/" + img
76 }
77
78 ]]>
79</mx:Script>
80
81<mx:Style>
82 .header {color: #70c7f1;}
83 .greyHeader {color: #777879;}
84 .controls {color: #000000; font-size: 13pt;}
85</mx:Style>
86
87 <mx:WebService id="popData" wsdl="http://www.url.co.uk/wld/services/phoneBook.cfc?wsdl" showBusyCursor="true" useProxy="false">
88 <mx:operation name="getData" fault="faultHandler(event)" result="resultsHandler(event)" />
89 </mx:WebService>
90
91 <mx:Fade id="fadeOut" duration="1.0" alphaFrom="1.0" alphaTo="0.0"/>
92 <mx:Fade id="fadeIn" duration="2000" alphaFrom="0.0" alphaTo="1.0"/>
93
94 <mx:Canvas id="outerCanvas" x="0" y="0" width="220" height="240" backgroundColor="#70c7f1" borderStyle="solid" cornerRadius="25" borderThickness="0">
95
96 <mx:Canvas id="innerCanvas" x="10" y="22" width="200" height="210" backgroundColor="#FFFFFF" borderStyle="solid" cornerRadius="25" borderThickness="0">
97
98 <mx:Label x="10" y="10" text="White label" id="header" styleName="header" fontWeight="bold"/>
99 <mx:Label x="78" y="10" text="Dating PhoneBook" styleName="greyHeader" fontWeight="bold"/>
100 <mx:DataGrid id="displayPeople" x="10" y="32" width="180" height="108" itemClick="changeImage(displayPeople.selectedItem.IMAGE)">
101 <mx:columns>
102 <mx:DataGridColumn headerText="Name" width="140" dataField="NAME"/>
103 <mx:DataGridColumn headerText="No." width="40" dataField="NO"/>
104 <mx:DataGridColumn headerText="Img" width="40" dataField="IMAGE" visible="false"/>
105 </mx:columns>
106 </mx:DataGrid>
107 <mx:Image x="138" y="150" source="@Embed(source='wldLogoTiny.png')" />
108 <mx:Image x="25" y="144" toolTip="{displayPeople.selectedItem.NAME}" id="userImage" visible="true" showEffect="{fadeIn}" />
109 </mx:Canvas>
110 <mx:Label text="_" styleName="controls" toolTip="Minimize" x="173" y="-2" click="onMinimize()" />
111 <mx:Label text="X" styleName="controls" toolTip="Close" x="184" y="1" click="onClose()" />
112
113 </mx:Canvas>
114
115</mx:WindowedApplication>